Tuesday, 26 December 2017

AWS ELB - Configuring Application ELB with EC2 instances demo

Hi Folks,

In this video tutorial you would see how to configure ELB service for EC2 instances installed with a web server.

What is ELB ? 

Elastic Load Balancing (ELB) is a load-balancing service for Amazon Web Services (AWS) deployments.

Elastic Load Balancing automatically distributes incoming application traffic across multiple targets
Targets could be :

Amazon EC2 instances, containers, and IP addresses.


Watch the video tutorial here or in YouTube.


Click here


Goal of this tutorial:
To demonstrate the usage of ELB service with 2 EC2 instances that are installed with a webserver(htttpd)
and to demonstrate to route the traffic between these 2 instances. i.e., incoming traffic to the application
should distribute using ELB.

Demo setup : 
1) default VPC, 1 default subnet(public), 2 default Availability Zones
2) Default security group with All traffic configured for inbound and outbound.
3) 2 Amazon linux EC2 instances

Health check :
Application Load balancer peridoically sends request to its registered targets to test their status.
These tests are called health checks.

Listners : 
A listner is a process that checks for connection requests. It is configured with a protocol and port number for
connections from clients to the load balancer and protocol and a protocol and port number for connections from the load balancer
to the targets.


Useful commands to setup webserver in Amazon Linux
sudo yum install httpd
sudo service httpd start
sudo chkconfig httpd on
sudo vi /var/www/html/index.html
sudo service httpd restart

index.html code in server 1
<html>
<body bgcolor ="#FF0000">
<h1>Hello world - First Web Server.! </h1>
<p><a href="https://cloud-and-devops-services.blogspot.in/</a></p>
</body>
</html>

index.html code in server 2
<html>
<body bgcolor ="#0000FF">
<h1>Hello world - First Web Server.! </h1>
<p><a href="https://cloud-and-devops-services.blogspot.in/</a></p>
</body>
</html>

References : 
AWS ELB - How to configure ELB and add web-servers?
https://www.youtube.com/watch?v=G8G1pgOaEBg

Wednesday, 20 December 2017

Cloud computing and DevOps - How these trends paved the way to next generation Information Technology?

The new buzzword in this dog-eat-dog IT industry is cloud computing and DevOps. The goal of this article is to brief about cloud computing and automation using DevOps tools and how the organizations are adopting, leveraging the technologies and practices to make handsome profits out of it.
Cloud Computing
Cloud computing refers to the online provisioning of computing services instead of utilizing traditional on-premise resources. It’s occupying a bigger slice of the market by incredible features such as security, scalability, reliability and maintainability. There are firms like Amazon, Google, Microsoft Azure and Oracle etc. who are market leaders in providing cloud services. These organizations maintain high availability data centers having high end internet in various parts of the world called regions and offering services such as instances creation or computing services, storage and networking services etc. over internet. It is known as replacement of on-premise data center(s) which consists of in-house infrastructure. Upon rental basis the vendors are offering ready to use services and termed it as “pay as you use” i.e., pay for the resources or services that will actually be in use.
The adoption of this trend is in leaps and bounds by new entrepreneurs and/or big players to have a single pane of cloud glass, so they can majorly concentrate only on product road maps and code development and less likely to bother about infrastructure and its management. By adopting this(cloud) practice companies are staying ahead of the curve in the cloud game thus making profitable business and investing in endeavoring to solve new problems in education sector, health care sector, finance etc.

Looking at workforce on cloud platforms, the term cloud became a breeze in the heads of people, but one should agree to the fact that it is like free as in speech, not free as in beer when get involved. There would be no ifs ands or buts for the excess or misuse of services on billing perspective, hence to work on cloud platforms, one ought to be experienced in networking, server’s management and should be possessed with architectural skills using the tools of respective service providers in prior. In other words, one must know all the ins and outs of the entire flow and precise usage of the tool(s).

This way, the cloud computing had become paramount importance in next generation IT and paved the way for new business trends in the IT sector by lowering the investment on purchasing and maintaining infrastructure and concentrating on development part.

DevOps
The other part of popular tech. buzzword that is taking the heads of people is DevOps. It’s a process of automating the development and operations of project(s) using tools. It consists of continuous development, continuous integration and continuous deployment and configuration management of a product that makes a continuous pipe line. This concept can be implemented using open source or enterprise tools and technologies, for instance tools like Jenkins, team city, puppet, chef etc. are widely used ones.

Initially this approach requires to build a pipe line starting with committing product code to a centralized repository from all the developers and then building and testing it in various phases. The other part of the pipe line is to deploy the code to tens of hundreds or to thousands of servers and it can be done using deployment tools such as Ansible. For instance, social applications like facebook or twitter or you tube needs to be available to millions of users daily, so these vendors make use of tools mentioned above whenever product(s) release takes place without any downtime.


In a nutshell, this approach saves a lot of time to develop and deploy projects and it eventually reduces manual efforts thus makes the customers delighted to make a profitable and highly running business.

- Sadakar Pochampalli

Creating AWS AMI Image from EC2 instance and use it to launch a new EC2 instance

Hi,
In this video session we will see how to create an AMI image from an existing EC2 instance.

What is AMI image ? 
AMI is an Amazon Machine Image


Step 1 :
Navigate to EC2 Dashboard which displays the list of available EC2 instances.
 I've an Amazon linux instance running.
Step 2 :
Check whether any available AMIs available in "Images" panel from left side pane
No AMI images are available, so lets start creating one.
Step 3 :
Select the instance from the list and then click on "Create AMI" from Actions -> Create
Step 4 :
In the popup wizard give a name and optional description for the new AMI.
Step 5 :
Creating AMI image with EBS Volume will create EBS snapshot. lets verify it in Snapshots from EBS section.

Now, use this AMI from "My AMI's" to create a new Instance.

Thank you.
Sadakar Pochampalli


Wednesday, 29 November 2017

Launching windows 2016 EC2 instance in AWS default VPC

Hi, 

In this video tutorial you would see how to create a windows 2016 instance in AWS default VPC and then how to connect to it using remote desktop.

The architectural diagram is as follows. 

NOTE: 
1) Please read the disclaimer at the end of this article. 

2) Assuming that you are aware of VPC and sub nets creation and this demonstration takes place in availability zone B of default VPC.


Watch out this video in zoom out mode or in youtube and relate it with the steps explained underneath it.


Launching windows 2016 EC2 instance in AWS default VPC

1) Login and navigate to EC2 dashboard

2) Click on "Launch Instance".

Step 1: Choose an Amazon Machine Image (AMI)
Microsoft Windows Server 2016 Base - ami-ac3370c3

Step 2: Choose an Instance Type
Type=t2.micro

Step 3: Configure Instance Details
Network: Default VPC
subnet: Default subnet B | ap-south-1b
NOTE: network and subnet names are given while creating VPC and subnets.

Step 4: Add Storage
Size=30, Volume Type = Magnetic

Step 5: Step 5: Add Tags
Key=Name, Value=windows2016

Step 6: Configure Security Group
Select an existing security group
Group ID= sg-f579229d
Group Name=default

Step 7: Review Instance Launch
click on Launch

  Ø  Create a new key-pair i.e., download a new pem file which will be later used to generate        windows admin password.

  Ø  Select the instance created (give name = windows 2016) and click on "actions" button       and then click on "Get Windows Password".

  Ø  Use the downloaded .pem file for "key pair path" and click on "Decrypt Password".

  Ø  You will see below information and keep password safely. (do not share it with anybody)

         Public DNS      ec2-13-127-25-168.ap-south-1.compute.amazonaws.com
         User name      Administrator
         Password        F88ZeRDB?aMEr@lKALYtjVHQTN76RfsJ

  Ø  Now , select the instance from the list and then click on "connect" button to download .rdp  file.

  Ø  Click on this .rdp file and use the the password created in previous step to login to the  server.

  Ø  Once you see authenticated into it,  do a quick check by opening power shell and type "ipconfig" and make note of IPv4 address and match it with the private IP from the AWS management console of instance.

This is how you can create an AWS windows 2016 free tier instance in default VPC.

I hope it helps someone.!

Disclaimer: This article is strictly not a production ready one instead an experiment on AWS. It is to be used for educational purposes only, therefore following this approach may not suitable or work in your environment and the author or reviewers are not responsible for correctness, completeness or quality of the information provided. 


Monday, 27 November 2017

Launch ubuntu EC2 instance in AWS custom VPC of public subnet

In this video tutorial you can learn how to lunch ubuntu instance in AWS custom VPC of public subnet and then how to connect to it using PuTTy tool.

Launch ubuntu EC2 instance in AWS custom VPC of public subnet

(Watch it in youtube or zoom out here)


(Click on image to get best view of content)


1) Login and navigate to EC2 dashboard

2) Click on "Launch Instance".

Step 1: Choose an Amazon Machine Image (AMI)
Ubuntu Server 16.04 LTS (HVM), SSD Volume Type - ami-bc0d40d3

Step 2: Choose an Instance Type
Type=t2.micro

Step 3: Configure Instance Details
Network : MyFirstPublicVPC
subnet : MyFirstPublicSubnet | ap-south-1a

Step 4: Add Storage
Size=8, Volume Type = Magnetic

Step 5: Step 5: Add Tags
Key=Name, Value=Ubuntu

Step 6: Configure Security Group
Create a new security group
Group Name = MyFirstSecutiryGroup
Source = My IP

MyFirstSecutiryGroup

Step 7: Review Instance Launch
click on Launch


Watch video tutorial for the above steps here.


Thank you.!

Wednesday, 8 November 2017

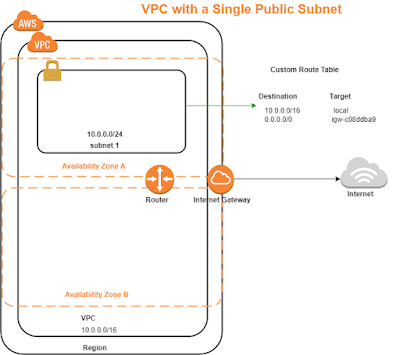
Amazon VPC with a single public subnet

In this video tutorial you will learn how to create a AWS custom VPC with a single public subnet

VPC with a Single Public Subnet


(Watch it in youtube or zoom out here)


(Click on image to get best view of architecture design)


1) Open the Amazon VPC console at https://console.aws.amazon.com/vpc/

2) In the dashboard, choose Start VPC Wizard.

3) Select the first option, VPC with a Single Public Subnet, and then choose Select.

4) Give VPC name=MyFirstVPCWithPublicSubnet and
          Subnet name=MyFirstPublicSubnet

Specify own IPv4 CIDR block range for the VPC and subnet, for this example let's leave the default values 10.0.0.0/16 and 10.0.0.0/24 respectively as shown in below image and click on "Create VPC"

5) Observe
Subnets, Route Tables, Internet Gateways.

Watch the steps in youtube tutorial at : Click me


References: