Hi,
In this video tutorial you would see how to create a windows 2016
instance in AWS default VPC and then how to connect to it using remote desktop.
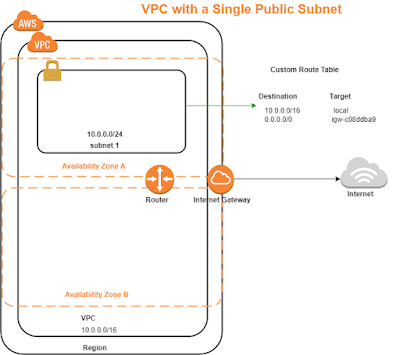
The architectural diagram is as follows.
NOTE:
1) Please read the disclaimer at the end of this article.
2) Assuming that you are aware of VPC and sub nets creation and
this demonstration takes place in availability zone B of default
VPC.
Watch out this video in zoom out mode or in youtube and relate it with the steps explained underneath it.
Launching
windows 2016 EC2 instance in AWS default VPC
1) Login and navigate to EC2 dashboard
2) Click on "Launch Instance".
Step 1:
Choose an Amazon Machine Image (AMI)
Microsoft Windows Server 2016 Base -
ami-ac3370c3
Step 2:
Choose an Instance Type
Type=t2.micro
Step 3:
Configure Instance Details
Network: Default VPC
subnet: Default subnet B | ap-south-1b
NOTE: network and subnet names are given
while creating VPC and subnets.
Step 4:
Add Storage
Size=30, Volume Type = Magnetic
Step 5:
Step 5: Add Tags
Key=Name, Value=windows2016
Step 6:
Configure Security Group
Select an existing security group
Group ID= sg-f579229d
Group Name=default
Step 7:
Review Instance Launch
click on Launch
Ø Create
a new key-pair i.e., download a new pem file which will be later used to
generate windows admin password.
Ø
Select
the instance created (give name = windows 2016) and click on
"actions" button and then click on "Get Windows Password".
Ø
Use
the downloaded .pem file for "key pair path" and click on
"Decrypt Password".
Ø
You
will see below information and keep password safely. (do not share it with
anybody)
Public DNS ec2-13-127-25-168.ap-south-1.compute.amazonaws.com
User name Administrator
Password F88ZeRDB?aMEr@lKALYtjVHQTN76RfsJ
Ø
Now
, select the instance from the list and then click on "connect"
button to download .rdp file.
Ø
Click
on this .rdp file and use the the password created in previous step to login to
the server.
Ø
Once
you see authenticated into it, do a
quick check by opening power shell and type "ipconfig" and make note
of IPv4 address and match it with the private IP from the AWS management
console of instance.
This is how you can create an AWS
windows 2016 free tier instance in default VPC.
I hope it helps someone.!
Disclaimer: This article is strictly not a production ready one instead an experiment on AWS. It is to be used for educational purposes only, therefore following this approach may not suitable or work in your environment and the author or reviewers are not responsible for correctness, completeness or quality of the information provided.


